|
Using Cuteftp
 CuteFTP Home General Usage Guide CuteFTP Home General Usage Guide
What is CuteFTP?
Launching CuteFTP
Establishing a connection
Connecting to an Existing Site
Adding a Site to the Site Manager
Editing a Site in the Site Manager
Removing a Site from the Site Manager
Creating a Certificate
Transferring Files
Resuming Transfers
Firewall and Proxy Server Configuration
Connecting to a URL
What is CuteFTP?

CuteFTP is a Windows-based File Transfer Protocol (FTP) application that allows you to utilize the capabilities of FTP without having to know all the details of the protocol itself. CuteFTP 6 Home simplifies FTP by offering a user-friendly Windows interface instead of a cumbersome command-line utility. CuteFTP gives novice PC users the ability to upload, download, and edit files on remote FTP servers around the world.
In addition to previous features such as Pasting URLs, importing bookmarks and resuming downloads, Version 6 of the long-time favorite now offers the following features:
Improved Site Manager
Automated File Scheduler
SSL v3 (TLS) Support
Smart Keep Alive
Advanced Bookmarks
Advanced Queue features
Launching CuteFTP
Start CuteFTP Home by clicking on the 'Start Button ->Programs (All Programs for Windows XP users) ->GlobalSCAPE -> CuteFTP Home' and select the CuteFTP Home icon. CuteFTP Home will now launch and take you to it's main screen.
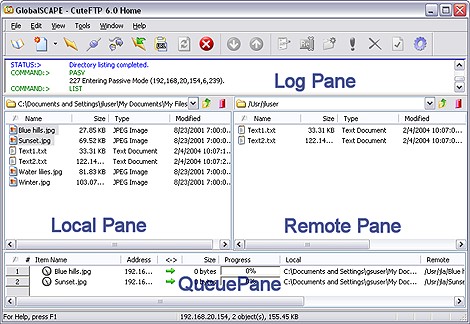 The main screen is used to transfer files to and from remote servers and is divided into four windows: an upper window (the log pane), two center windows (the local and remote panes), and a lower window (the queue pane). The two center windows represent files available on local and remote drives, much like Windows Explorer. When you first open CuteFTP Home, the upper window will be hidden. You can choose to hide or display the upper window, the center left window, and the bottom window by clicking on View -> Show Panes then selecting the pane(s) you wish to view. The main screen is used to transfer files to and from remote servers and is divided into four windows: an upper window (the log pane), two center windows (the local and remote panes), and a lower window (the queue pane). The two center windows represent files available on local and remote drives, much like Windows Explorer. When you first open CuteFTP Home, the upper window will be hidden. You can choose to hide or display the upper window, the center left window, and the bottom window by clicking on View -> Show Panes then selecting the pane(s) you wish to view.
Back to top
Establishing a connection
Before you can connect to an FTP site, you must be connected to your Internet Service Provider (ISP). Since virtually all ISPs differ in connection routines, consult their technical support if you have problems getting your computer on the Internet. Once connected to the internet, you may then connect to an ftp site.
Back to top
Connecting to an Existing Site

- Launch the Site Manager by clicking on the Site Manager icon or by clicking on 'Tools -> Site Manager -> Display Site Manager' from the main navigation menu.
- Select a folder (click on the name) from the list in the left window of the Site Manager screen.
- Choose a site (click on the name) listed below the selected folder.
- Click the Connect button.
After connecting CuteFTP will display a message from the server administrator informing you of rules and regulations on the server. Click the OK button at the bottom of this screen to clear the message.
Back to top
Adding a Site to the Site Manager

- Launch the Site Manager by clicking on the Site Manager icon or by clicking on 'Tools -> Site Manager -> Display Site Manager' from the main navigation menu.
- Select a folder (click on the name) for the new site to reside in or create a new folder. To create a new folder, right-click and select 'New Folder' from the menu. Enter the new folder name and press 'Enter' on your keyboard.
- Click the 'New' button and select either 'FTP Site' or 'FTP / SSL Site' (only select this option if your host requires an SSL conneciton). Enter a name for your site in the 'Label For Site' field.
- Enter the FTP server address in the 'FTP Host Address' field. The FTP Host Address provided to you by Service Provider hosting your Web pages. (The host address will follow the format ftp.xxxx.com or 123.456.78.100. It should not contain ftp:// or http://).
- Enter the User ID in the 'FTP site User ID' field. The User ID is provided by your Service Provider and is case sensitive. It may also be called a Login ID.
- Enter the password in the 'FTP site Password' field. The password is provided by your Service Provider and is also case sensitive.
- Change the port number if necessary (the majority of FTP sites use 21).
- To connect to your new site, highlight it in the left window and click the 'Connect' button.
Back to top
Editing a Site in the Site Manager
- Select a folder (click on the name) from the list in the left window of the Site Manager screen.
- Choose a site listed below the selected folder
- Make any changes in the fields listed to the right.
Back to top
Removing a Site from the Site Manager
- Select a folder (click on the name) from the list in the left window of the Site Manager screen.
- Choose a site listed below the selected folder.
- Click the 'Delete' button at the bottom of the Site Manager screen.
Note: Folders may be deleted or renamed by selecting the folder and clicking on the 'Delete' or 'Rename' buttons.
Back to top
Creating a Certificate
If you are connecting to an SSL site, your ftp host may require that you have a certificate. With CuteFTP 6 Home you can easily create certificates. SSL servers use certificates to determine whether or not they will allow you to connect.
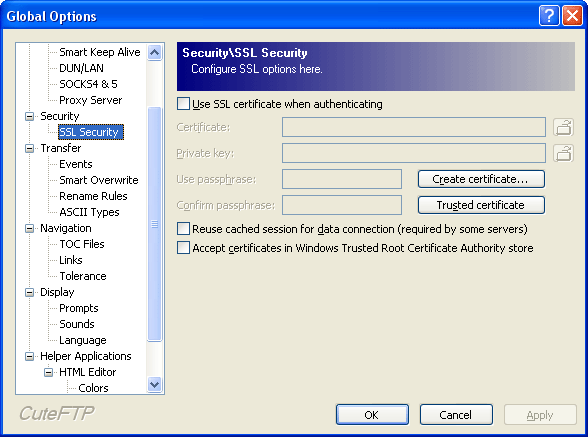 To create an SSL certificate: To create an SSL certificate:
- On the menu bar click Tools -> Global Options -> Securiy -> SSL Security.
- Click the Create Certificate button.
- Enter the Certificate Set Name - This will be the name of the certificate generated by the Certificate Wizard.
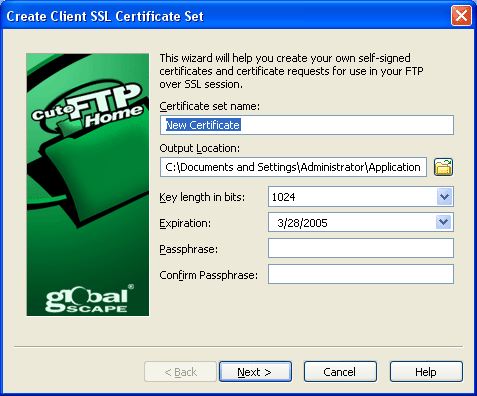
- Enter the Output Location - Type a path or click the browse button to choose the folder where you will save the certificate.
- Choose a bit-length for the certificate private key. CuteFTP supports up to 4,096 bit keys
- Choose an Expiration date - This defines how long the certificate will remain valid.
- Enter and confirm the Pass Phrase - The Pass Phrase can be any combination of characters or spaces. It is used to encrypt the private key. Do not lose the pass phrase. The certificate will be useless without it.
- Click the Next button.
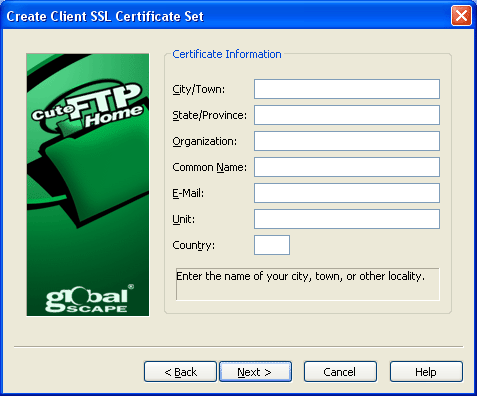
- Enter the City/Town of your organization.
- Enter the State/Province of your organization.
- Enter the name of your Organization.
- Enter the Common Name, typically this is your name or the domain name associated with your site.
- Enter your E-mail address.
- Enter the Unit or name of your department, i.e. Information Systems.
- Enter the two-letter Country code for your organization's nation.
- Click the Next button.
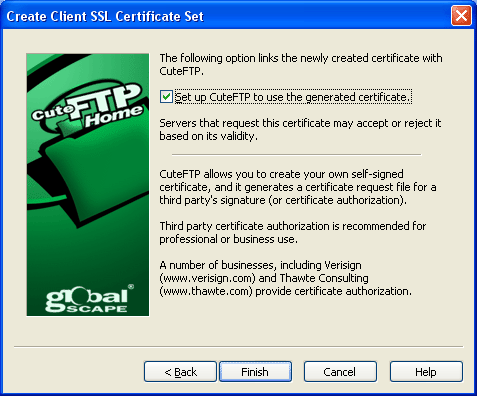
- Select the Set up CuteFTP to use the generated certificate check box - the wizard will automatically associate the certificate to CuteFTP. It can later be unassociated by clearing the Use SSL Certificate check box in Tools > Global Options > Security > SSL. If the check box is cleared, the wizard will only save the certificate files in the directory you specified in Step 4.
- Click Finish.
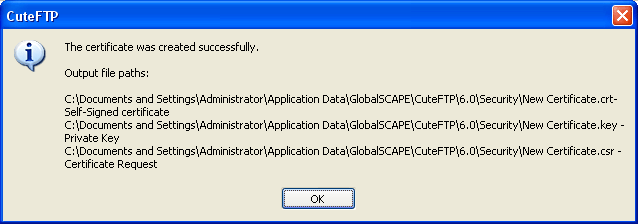 CuteFTP will display the paths to all the files generated for your certificate. Click 'ok' to complete the creation of the certificate. CuteFTP will display the paths to all the files generated for your certificate. Click 'ok' to complete the creation of the certificate.
Notes:
Not all SSL sites require certificates.
When you create a certificate CuteFTP generates three files;
- A Private key file (.key) - The private key should never be distributed to anyone. It is used to decrypt sessions encrypted by a public key.
- A Certificate request file (.csr) - This file can be signed by GlobalSCAPE Secure FTP Server's Certificate Signing Utility or sent to an intermediate Certificate Authority such as Verisign or Thawte for signing.
- A Certificate file (.crt) - This is a signed certificate, whether self-signed or signed by an intermediate certificate authority.
If the server will accept self-signed certificates, you will be able to connect with the .crt file and .key file you created and associated to CuteFTP, provided the server has added your certificate to its trusted list.
You can export certificates (.crt files) from CuteFTP's Trusted certificate store, located under Global Options > Security, SSL Security.
Back to top
Transferring Files

Once you are connected to an FTP site, you may upload and download files. The left side of the main window contains the names of files on your computer. The right side contains files on the server you are connected to.
To upload a file, you may do any of the following:
Click on a file in the left window, hold down the button, and drag the file to the right window.
Right-click on a file in the left window and select 'Upload' from the popup menu.
Double-click on a file in the left window.
Left-click once on a file in the left window and select 'Upload' from the 'Transfer' menu.
Left-click once on a file in the left window and press the 'Control' and 'Page Up' keys simultaneously.
To download files, use one of the following methods:
Click on a file in the right window, hold down the button, and drag the file to the left window.
Right-click on a file in the right window and select 'Download' from the popup menu.
Double-click on a file in the right window.
Left-click once on a file in the right window and select 'Download' from the 'Transfer' menu.
Left-click once on a file in the right window and press the 'Control' and 'Page Down' keys simultaneously.
Back to top
Resuming Transfers
- Select a folder (click on the name) from the list in the left window of the Site Manager screen.
- Choose a site listed below the selected folder.
- Click the 'Delete' button at the bottom of the Site Manager screen.
Note: Folders may be deleted or renamed by selecting the folder and clicking on the 'Delete' or 'Rename' buttons.
Back to top
Firewall and Proxy Server Configuration
A firewall or proxy server is a safeguard utilized by many Local Area Networks (LANs) or Wide Area Networks (WANs) to protect the network from unauthorized access. If you are using CuteFTP on a LAN or WAN, you might experience some problems caused by the network settings. If you are not on a LAN or WAN, check with your ISP about the existence of a firewall. When first using CuteFTP, use the default firewall settings and try connecting to several of the predefined sites in the 'Site Manager'. If every site tried gives the message "can't connect" or "can't login, still trying," then you probably need to configure the firewall settings. If your LAN or WAN supports FTP Proxy protocol, you will need the following information:
IP address for your firewall host
Port number for the FTP proxy server
User name and password
To configure your firewall or proxy settings, click on 'Tools -> Global Options -> Connection -> Socks 4 & 5/Proxy Server.' Enter this information in the respective fields.
For more information about configuring firewalls, please visit here.
Back to top
Using the 'Connect to URL' Option
You can paste a URL (universal resource locator) into CuteFTP by using this function.
- From any Windows application, highlight the URL. The URL may be general (ftp://www.cuteftp.com) or specific (ftp://www.cuteftp.com/pub/cuteftp/cute2632.exe).
- Copy the URL to the clipboard by pressing Ctrl+C on your keyboard.
- Return to CuteFTP and select 'File -> Connect -> Connect to URL' from the Menu Bar.
- Press the Ctrl+V (paste) keys, then choose OK.
- CuteFTP will parse the URL and start downloading the file.
Back to top
If you are interested to know more about any of our archived FAQ or services, please visit our
online F.A.Q.
|
 CuteFTP Home General Usage Guide
 The main screen is used to transfer files to and from remote servers and is divided into four windows: an upper window (the log pane), two center windows (the local and remote panes), and a lower window (the queue pane). The two center windows represent files available on local and remote drives, much like Windows Explorer. When you first open CuteFTP Home, the upper window will be hidden. You can choose to hide or display the upper window, the center left window, and the bottom window by clicking on View -> Show Panes then selecting the pane(s) you wish to view.
  CuteFTP will display the paths to all the files generated for your certificate. Click 'ok' to complete the creation of the certificate.


